


Sprouts are a low-calorie treat that is rich in fibre and packed with protein. It is a low-fat food that helps lower cholesterol levels and maintains healthy body weight. Chlorophyll present in sprouts helps remove toxins from the cells and lymphatic system. It also has enzymes that ease the digestive process, promote hair growth, and reduce signs of ageing.
What is amazing about sprouts is that they can also be grown from the comfort of your home. Sprouting your own beans is better for the environment, and your body, and it is economical. It is also an extremely fast and easy process and one that not even requires basic knowledge of gardening. It doesn’t even require special equipment and can be grown in a simple mason jar.
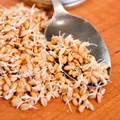
But before we start to learn about growing our sprouts, we must take a look at beans and legumes that are suitable for sprouting in a jar.
Legumes and beans need to be sprouted before eating because they contain indigestible proteins that needs to be soaked and cooked in order to be digestible. Mung beans are tiny green beans that are popularly sprouted at home because they have a high yield, don’t require a lot of maintenance, and are also a powerhouse of flavour and nutrition. Lentils are legumes that are also a popular choice for at-home sprouting.
Steps to grow bean sprouts in a jar
Rinse beans- If this is your first time sprouting beans at home, then mung beans, chickpeas, and alfalfa are the safest choice of beans. It is important that the beans are properly rinsed before the process begins because it allows you to clean all impurities from them and notice whether the seeds are infected or not. Remove all damaged seeds and foreign objects during the process as well.
Pick the right jar- A wide-mouth mason jar is perfect for sprouting beans. Wash the jar carefully with soap and remove all soap residue. Then, prepare a sprouting lid for your mason jar from a polyester window screen. You can also buy jars specifically manufactured for sprouting purposes.
Add the seeds- Once your mason jar and lid are prepared, place two full tablespoons of beans seeds in it and fill the jar half-way with cold water. Let the seeds soak overnight. The beans should be soaked for 8 to 12 hours. When it is drained, it should be put in a spot that is away from the sunlight and at an upside-down angle, so that the moisture can escape through the opening of the jar.
Make sure that air can circulate properly through the opening. The jar should be drained in the morning. Repeat the process until the seeds have grown in size. The beans should be soaked at room temperature. Beginners must note that the soaking period is longer for bigger seeds.
Store the sprouts- Once the seeds have sprouted to your preferred size then give them a final rinse and drain before storing them in the refrigerator. The sprouts can be kept in the fridge for at least a week or until they have dried out. Depending on the legume or bean you have chosen to sprout, you can either eat the sprouts as is or cook them in boiling water until they are firm. You can use the finished product to make sandwiches, salads, hummus, soups, and even stir-fried.